- ALL FAQ
- HARDWARE
- FIRMWARE
- SOFTWARE
- SDK
In our best efforts to provide an excellent service to all of our users, we are here to release a firmware to prevent the following problems for your M3Pro and M5Plus:
– The freeze with a red light on
– The blocked keyboard
– The connection with network and USB flash drive
M3 Pro: Please download the firmware.
M5 Plus: Please download the firmware.
After the upgrade, please reboot the device and check the firmware version in the device info (Menu -> Setting -> Info) to see if the upgrade is successful.
If the firmware version hasn’t changed, please kindly follow the instructions and upgrade it again.
If the problems still exist with this firmware version, please report the issues to the technical support team. We apologize for any inconvenience this may cause.
You can always reach out to us at [email protected] when you have any questions or concerns.
In our best efforts to provide an excellent service to all of our users, we are here to help you fix the problem of the face registration for Facedeep 5.
If your Facedeep 5 prompts ”Fail. The user is full!” when you register a face, please install this patch. It is a solution for the problem.
Please download the patch.
After installed the patch, please restart the device and check if the problem is fixed to ensure the installation is successful. If not please check the instructions and install the patch again.
Please report any issues to the technical support team. We apologize for any inconvenience this may cause. If you have any questions or concerns, you can always reach out to us at [email protected]
In our best efforts to provide an excellent service to all of our users, we are here to help you fix the problem of the facial recognition for Facedeep 3 and Facedeep 5.
If your Facedeep 3 or Facedeep 5 can’t recognize the users with big beard, please install this patch. It is a solution for the problem.
Facedeep 3: Please download the patch.
Facedeep 5: Please download the patch.
After installed the patch, please restart the device and check if the problem is fixed to ensure the installation is successful. If not please check the instructions and install the patch again.
Please report any issues to the technical support team. We apologize for any inconvenience this may cause. If you have any questions or concerns, you can always reach out to us at [email protected]
Recently, we released the latest kernel firmware in order to experience better performance on our C2 Slim device. Hereby, our team creates this faq in order to help customers understand how to update the firmware correctly on C2 Slim
About new firmware :
- Bug cause device freezing with blinking green light is fixed.
- Better performance on fingerprint verification
Download firmware for C2 Slim: https://www.dropbox.com/s/zx9adfozeanfs3a/c2slim.zip?dl=0
Detail update steps:https://www.anviz.com/faq/56.html
After upgrading the firmware please restart the device and check the Firmware Ver. from webserver is 03.16.AY to ensure the upgrade process is successful. If not please check the operating steps and upgrade the firmware again.
Please mail to [email protected] if you have any questions!
Please read the following step-by-step instructions carefully for setting up Wi-Fi on your GC100 and GC150 device.
Note:
GC150 is equipped with built-in Wi-Fi and it’s an optional function for GC100, please check the label on your GC100 and make sure if it has Wi-Fi function before getting started to set up the Wi-Fi.
Preparation:
Step 1: Connect GC100 or GC150 to the same Wi-Fi that your PC is using.
Step 2: Login to your WiFi router and choose an IP address as GC100 or GC150 device WiFi IP address from your IP address range (192.168.120.2 to 192.168.120.254 in the example below) for your device.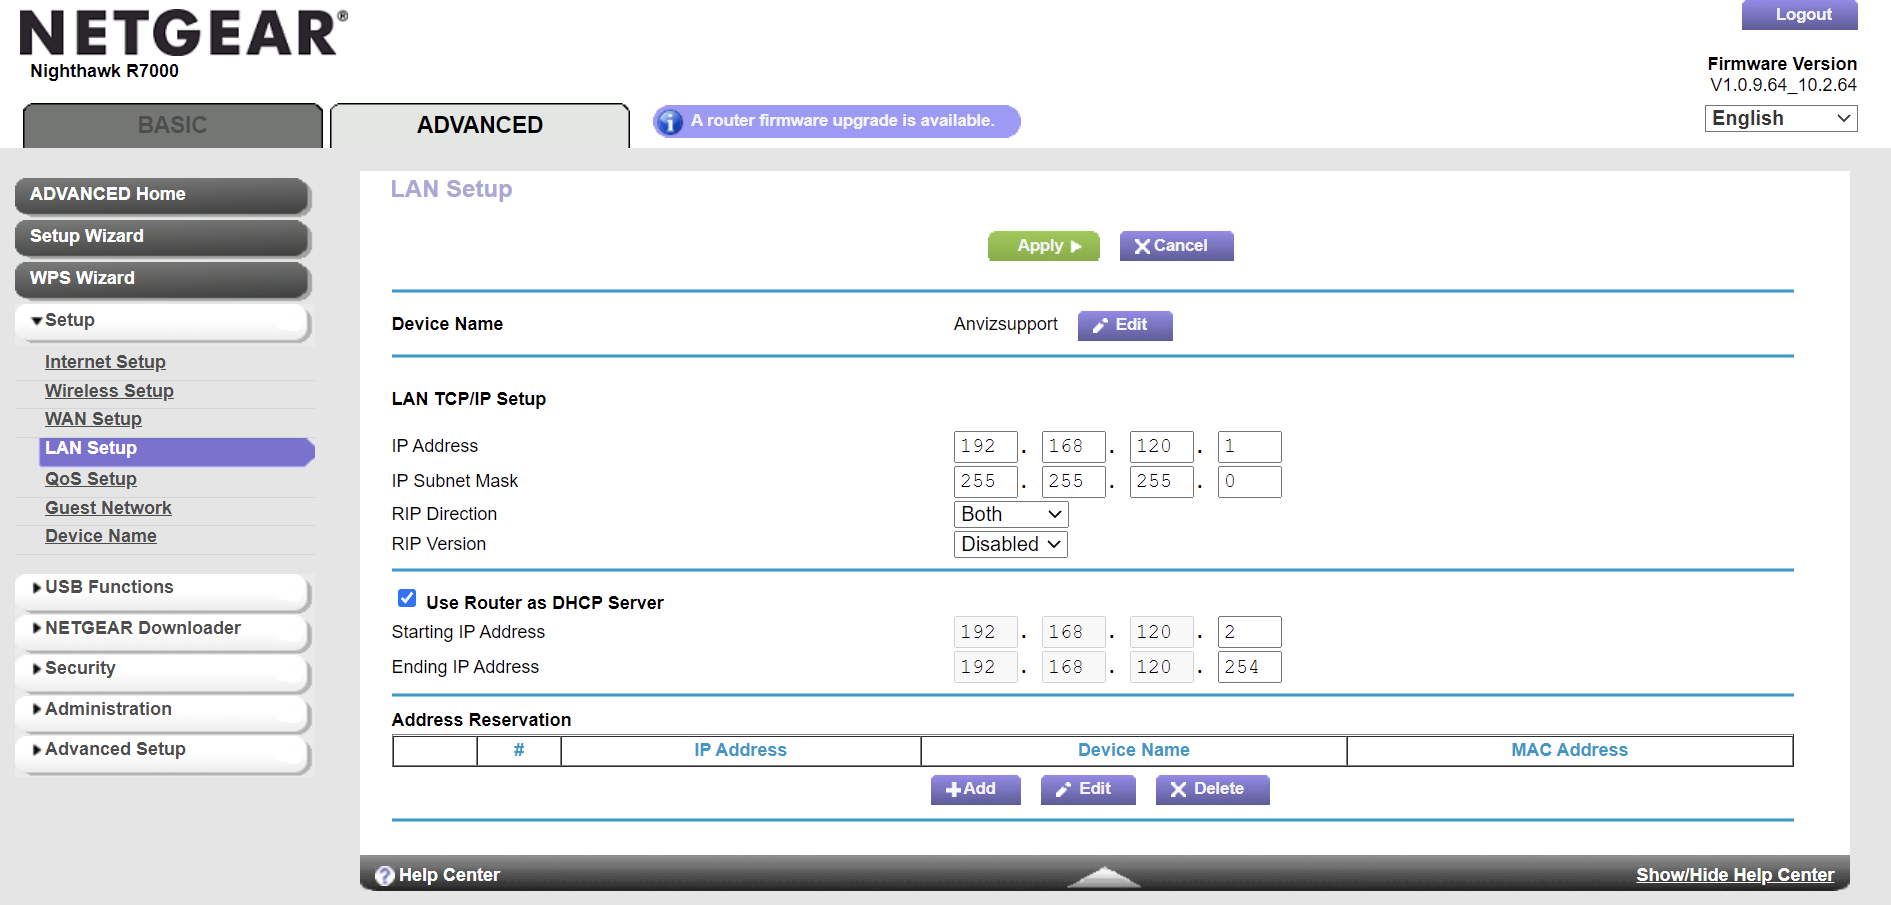
Setting Up Using Wi-Fi Client:
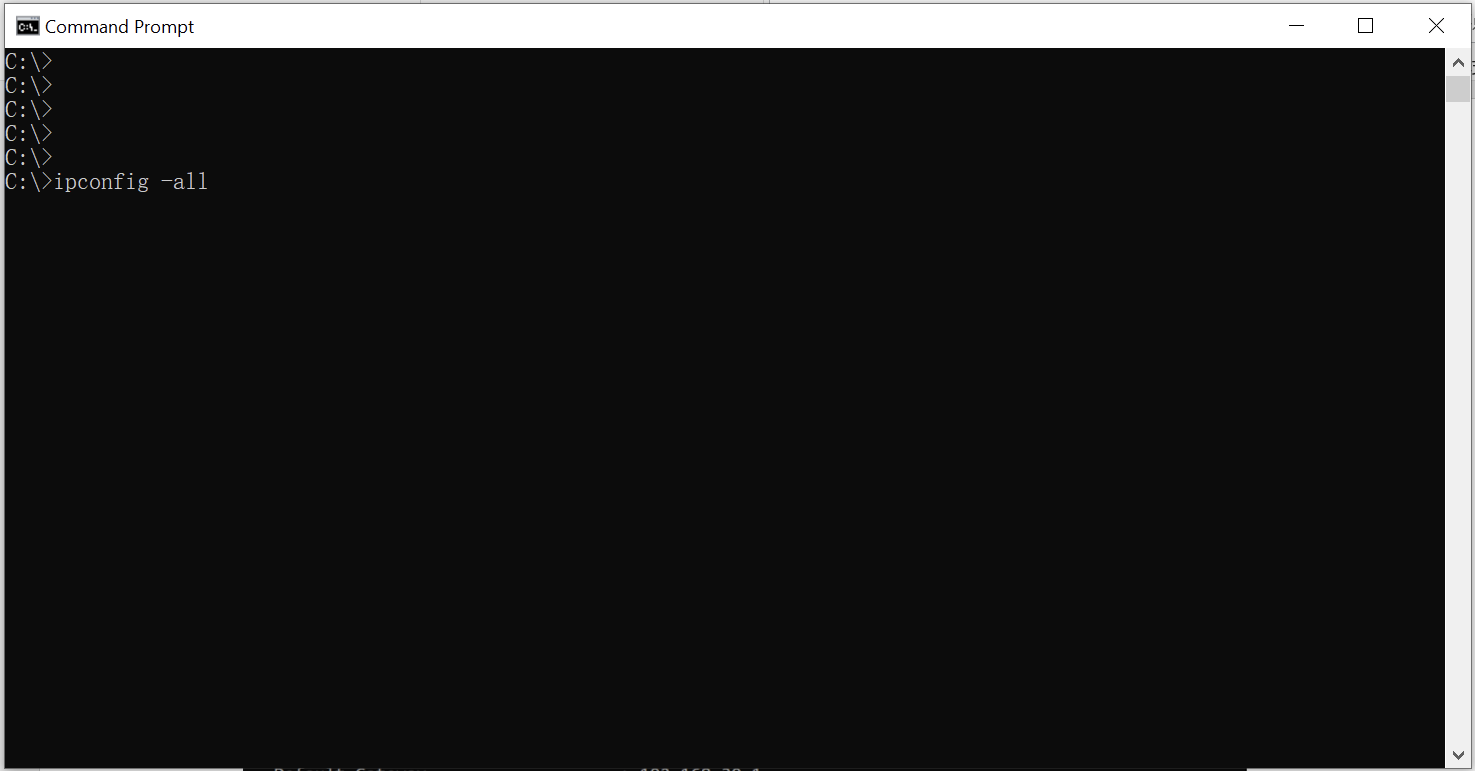
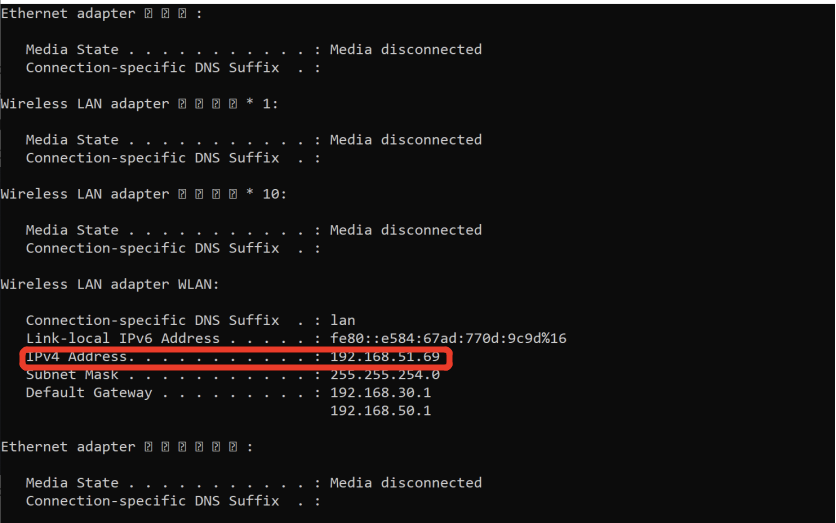
Step 1: Get IPv4 address by typing ipconfig in PC command.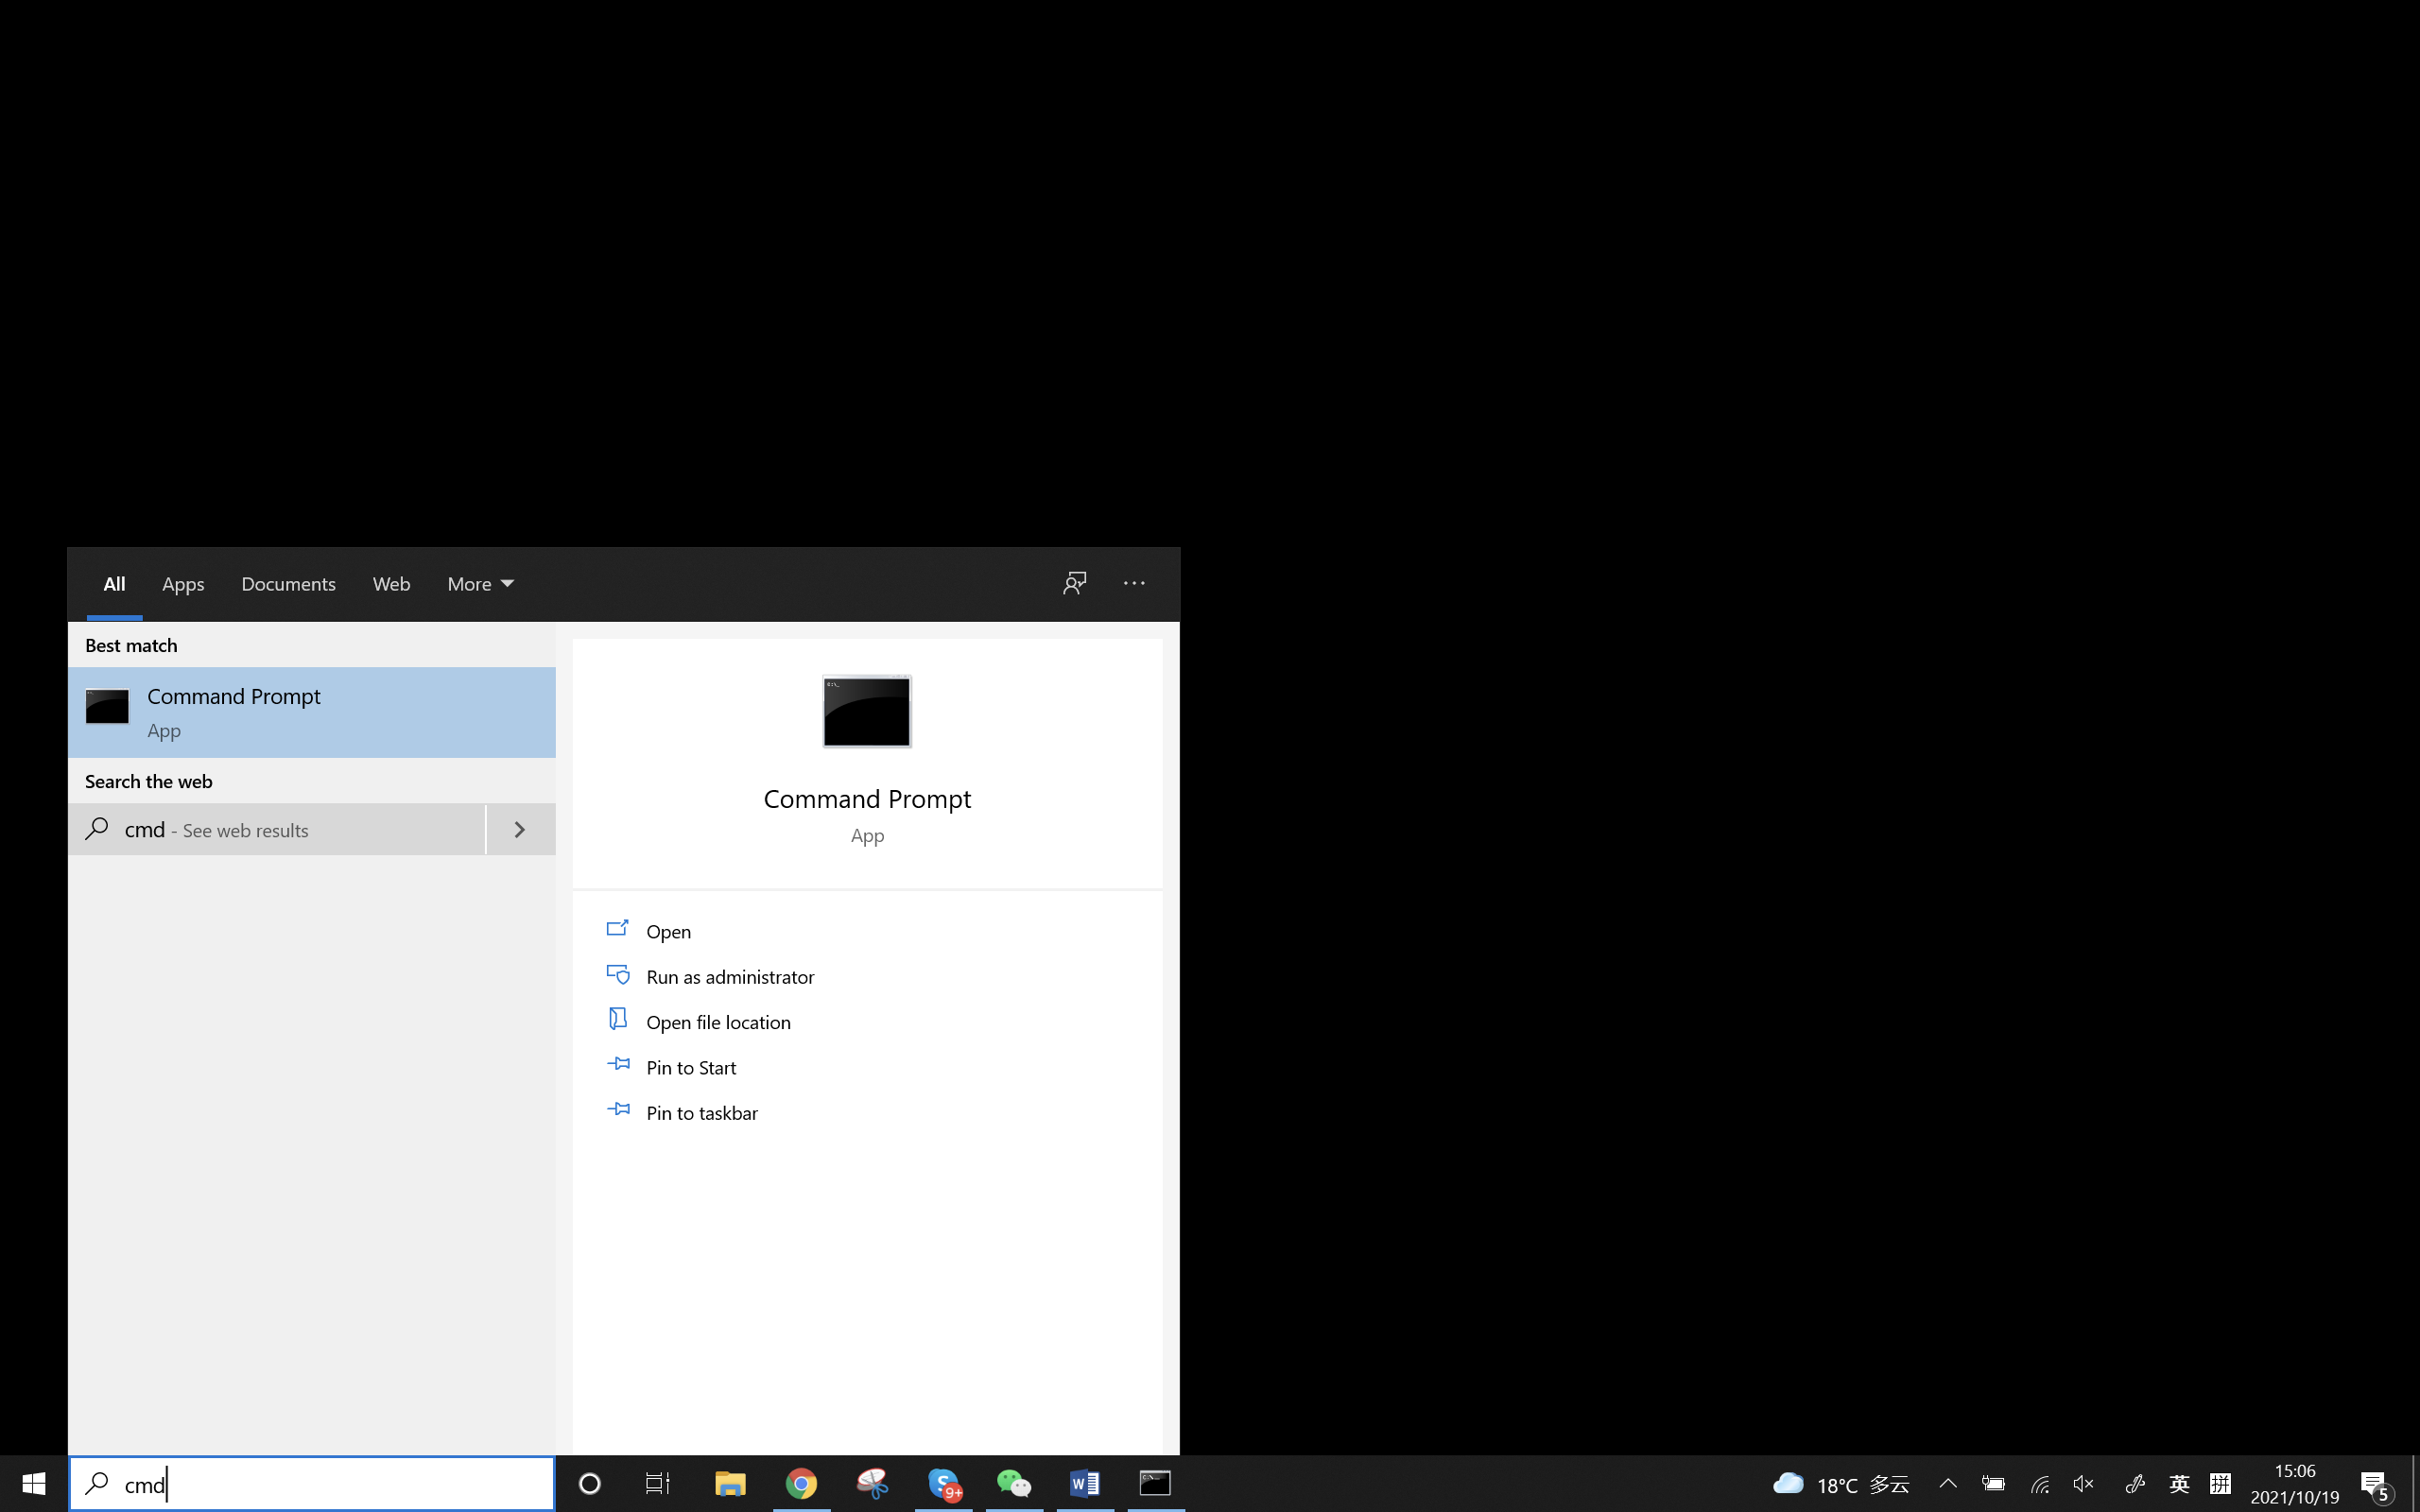
Step 2: Select Wi-Fi Client Mode on your device.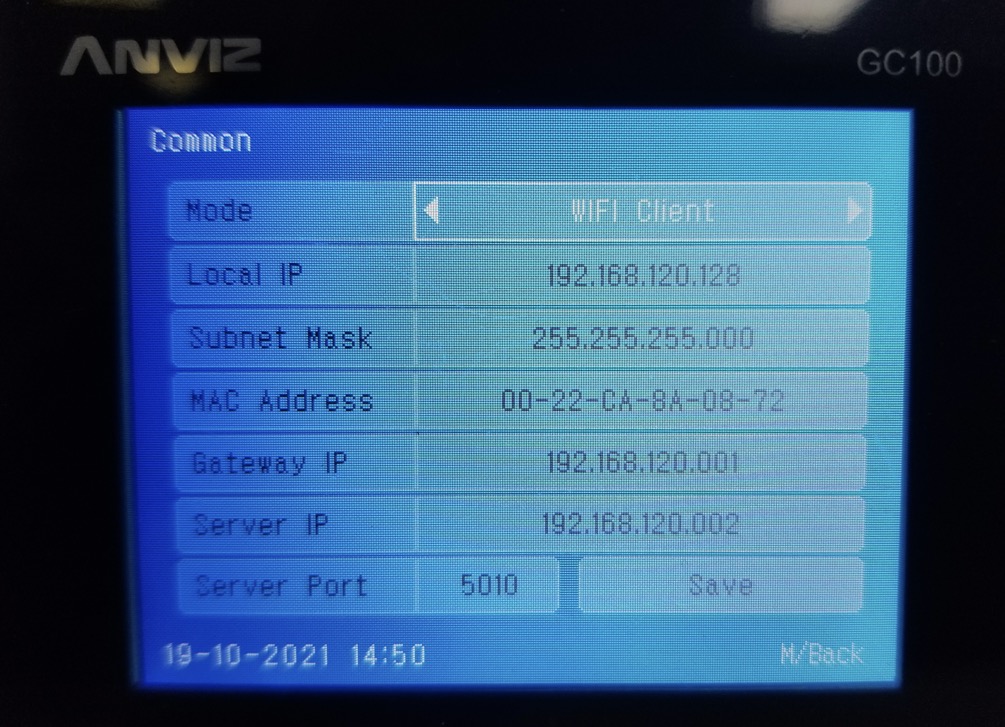
Step 3: Change Server IP to your IPv4 address.
Step 4: Login to your CrossChex software and match your device info in the device menu and Select the LAN (Client/ Client+DNS) mode to add your device.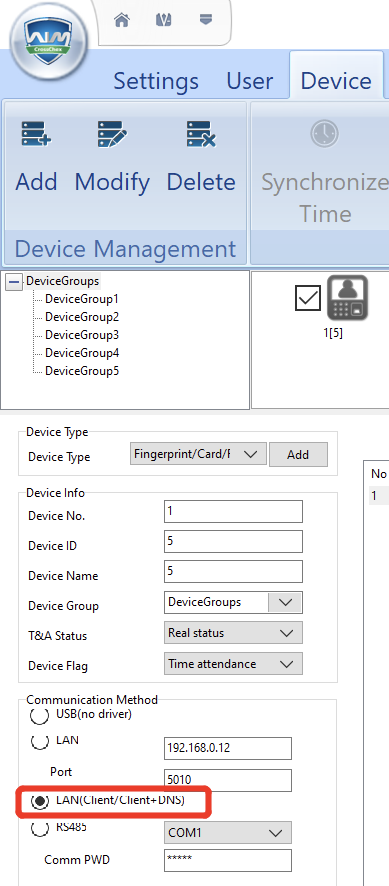
Setting Up Using Wi-Fi Server:
Step 1: Select Wi-Fi Server Mode on your device.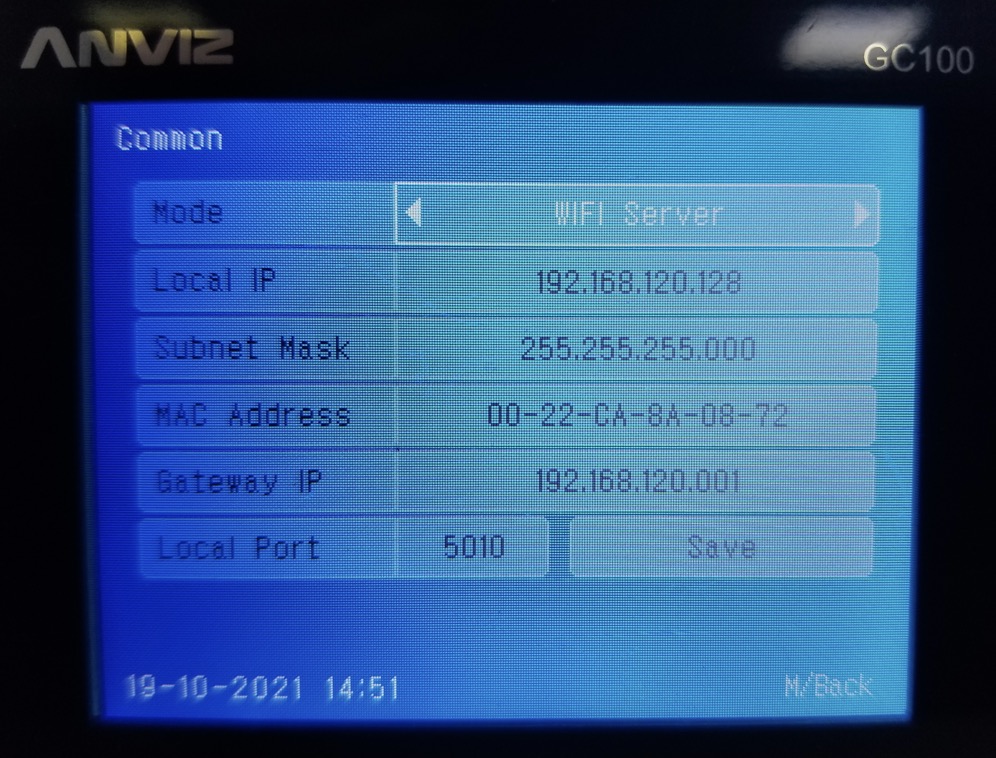
Step 2: Input the device IP address you chose into Local IP.
Login to your WiFi router and choose an IP address as GC100 or GC150 device WiFi IP address from your IP address range (192.168.120.2 to 192.168.120.254 in the example below) for your device.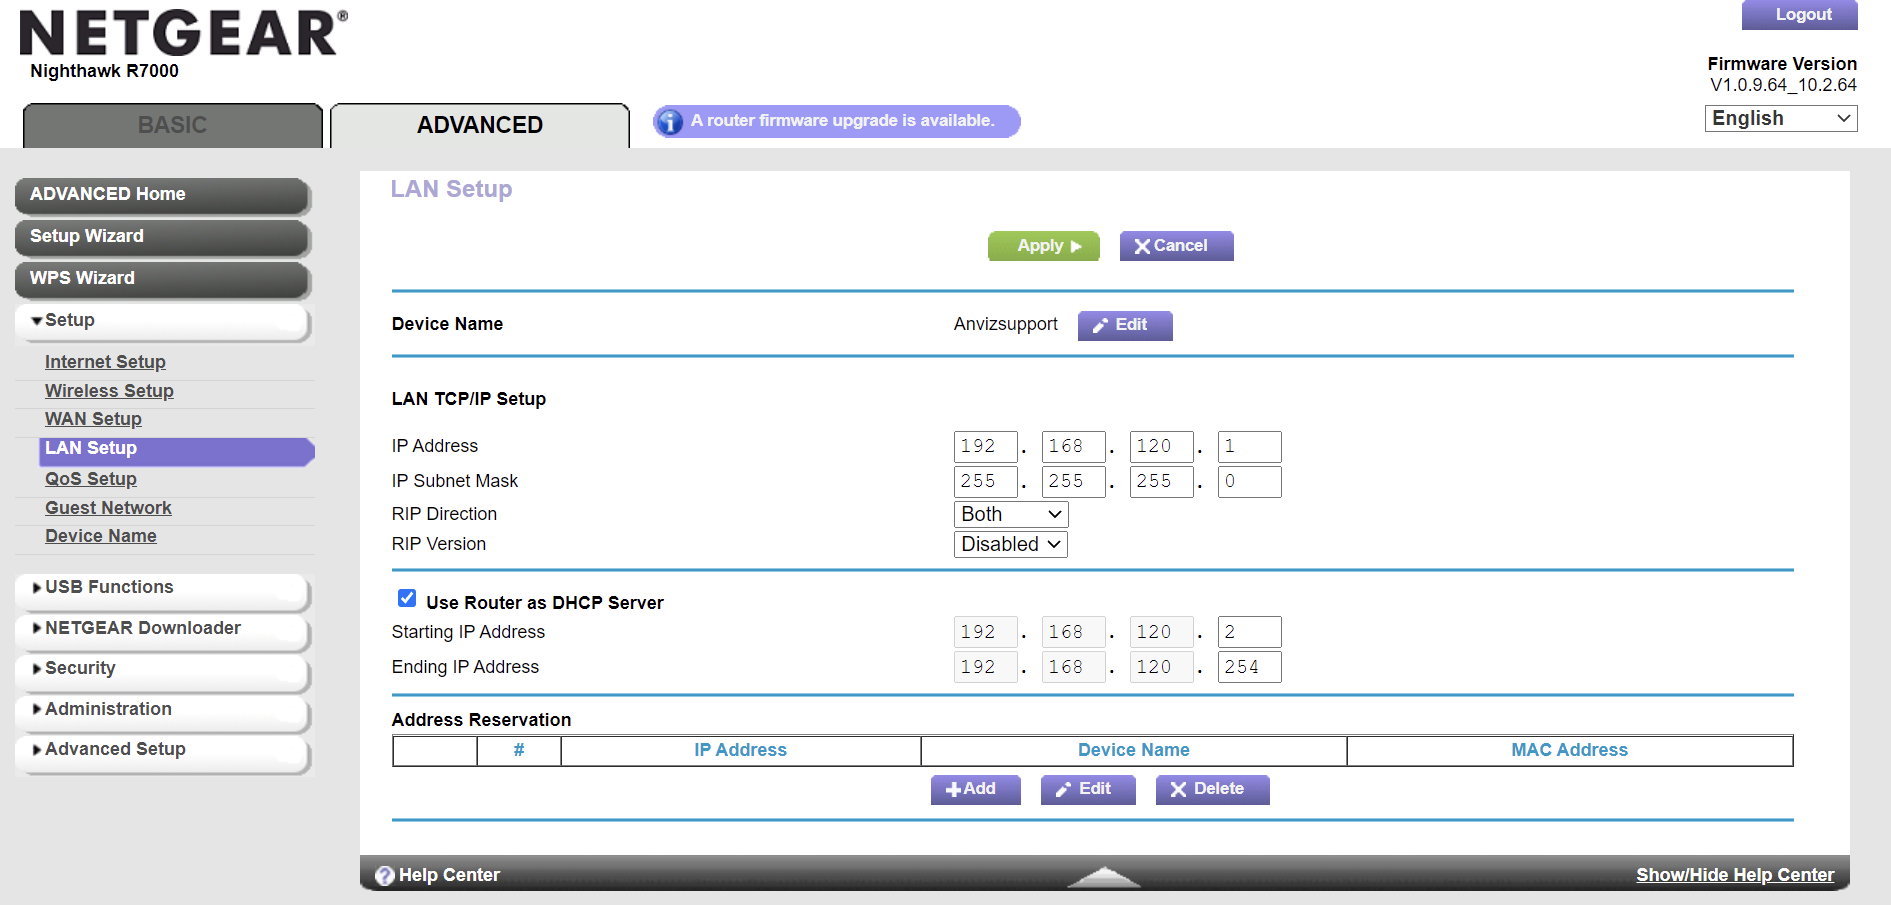
Step 3: Login to your CrossChex software and match your device in the device menu.
Step 4: Select the LAN mode and Input the IP address again.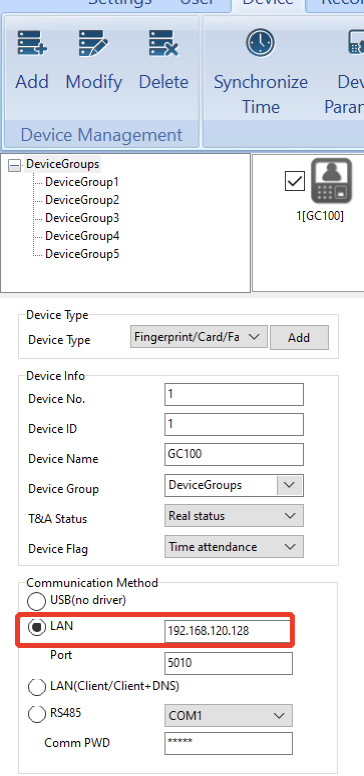
Test and check if Wi-Fi works on your GC100/GC150. If you still have any questions, you can always reach out to us at [email protected]. We are always ready to help.
Recently, we received several reports about user experience of Facedeep 3 & Facedeep 3 IRT. Some users may experience the difficulty with the system error code 2001 on Facedeep 3 & Facedeep3 IRT
Therefore, we made improvements and squashed bugs so Facedeep 3 & Facedeep3 IRT is even better for you. The process will take around 10 minutes.
Please download the latest kernal firmware here
https://www.dropbox.com/s/mac3xmf6eil7mdn/deep3.aup?dl=0
For firmware upgrade instructions please follow the link here https://www.anviz.com/faq/350.html . We recommend upgrading the firmware to the latest version once it is available.
After upgraded the firmware please restart the device and check the Kernel Ver. from Basic Info is gf561464 to ensure the upgrade is successful. If not please check the instructions and upgrade the firmware again.
Please report any issues to the technical support team. We apologize for any inconvenience this may cause. If you have any questions or concerns, you can always reach out to us at [email protected]
There are various USB flash drive in the market, Anviz device can not compatible with all the USB flash drive.
We suggest use SanDisk or Kingston brand USB flash drive. Capacity is under 8GB. File system is FAT32.
If still not working, try again with another one or getting support from Anviz.

1) Step 1.1: Connection via mini USB. (Skip to Step 1.2 if using the TCP/ IP model)
CrossChex -> Device -> Add -> Input ‘0’ as device ID -> Add
2) Step 1.2: Connection via the TCP/ IP model.
Click the ‘Add’ button and then ‘Search’ button. All available devices will be listed below. Choose the one device that you want to connect to CrossChex, and press the ‘Add’ button.
Step 2: Test if the device is connected to CrossChex.
Click the ‘Synchronize time’ to test if the device/s and CrossChex are connected successfully.
3) There are two ways to remove the admin’s permission.
Step 3.1.1:
Select the user/s that you want to remove admin permission. Double click the user to open Add/ Modify User Info page, then change ‘administrator’ (the administrator displays in red font) to ‘Normal user’.
CrossChex -> User -> Select one user -> change Administrator -> Normal user
Choose ‘Normal user’, then click the ‘Save’ button. It will remove the user’s admin permission and set it as a normal user. 
Step 3.1.2:
Click ‘Set Privilege’, choose the group, then click the ‘OK’ button.

Step 3.2.1: Back up the user and records. 

Step 3.2.2: Initialize the Anviz Device (*******Warning! All Data Will Be Removed******)
Click Device information, click initialize the device, then click ‘OK’
1) Reset Anviz devices admin pasword.
Run CrossChex -> Device -> Device Parameter -> Management Password -> OK
Part 1: CrossChex Connection Guide
Step 1: Connection via the TCP/IP model. Run the CrossChex, and click the ‘Add’ button, then the ‘Search’ button. All available devices will be listed below. Choose the device that you want to connect to the CrossChex and press the ‘Add’ button.
Step 2: Test if the device is connected to the CrossChex.
Click the ‘Synchronize time’ to test and make sure the device and CrossChex are connected successfully.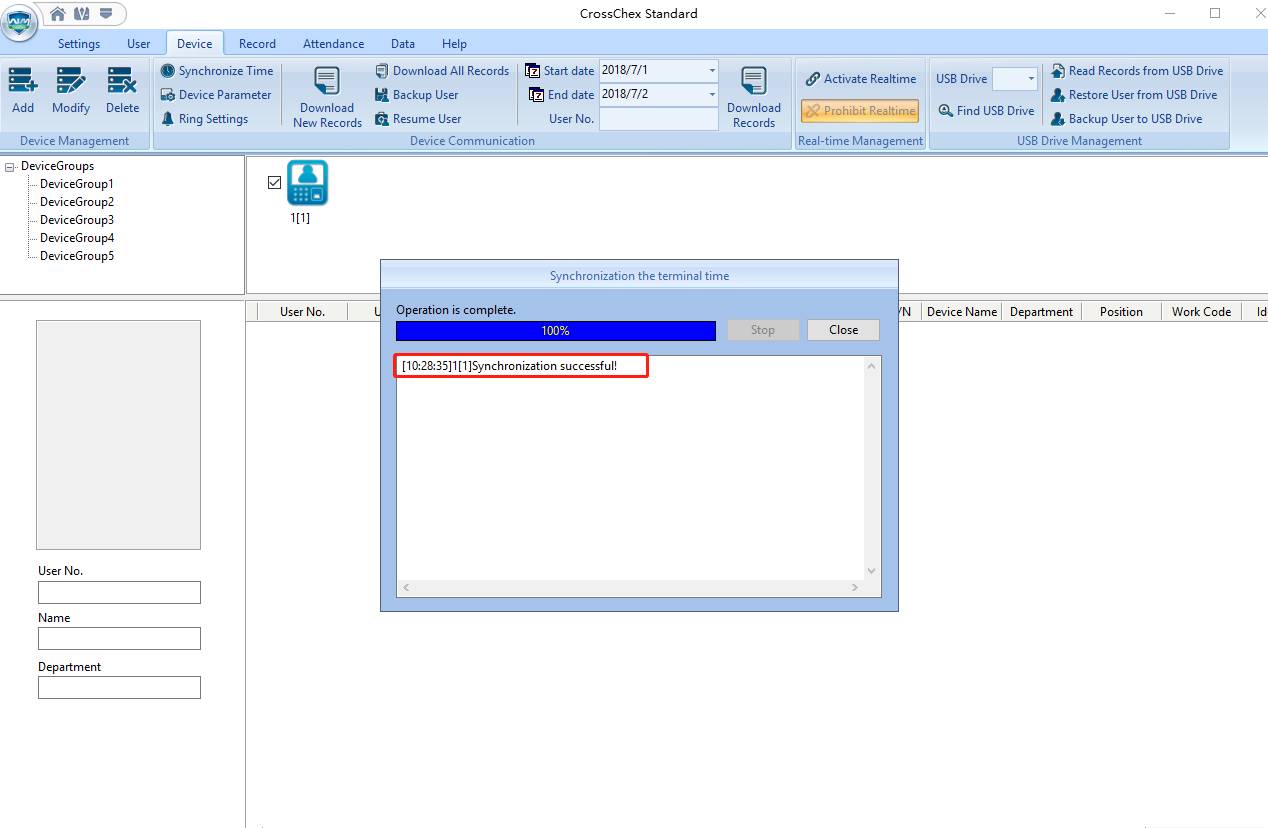
Step 3.1.1
Select user/s that you want to cancel administrator permission, and double click the user, then change ‘administrator’ (the administrator will display in red font) to ‘Normal user’.
CrossChex -> User -> Select one user -> change Administrator -> Normal user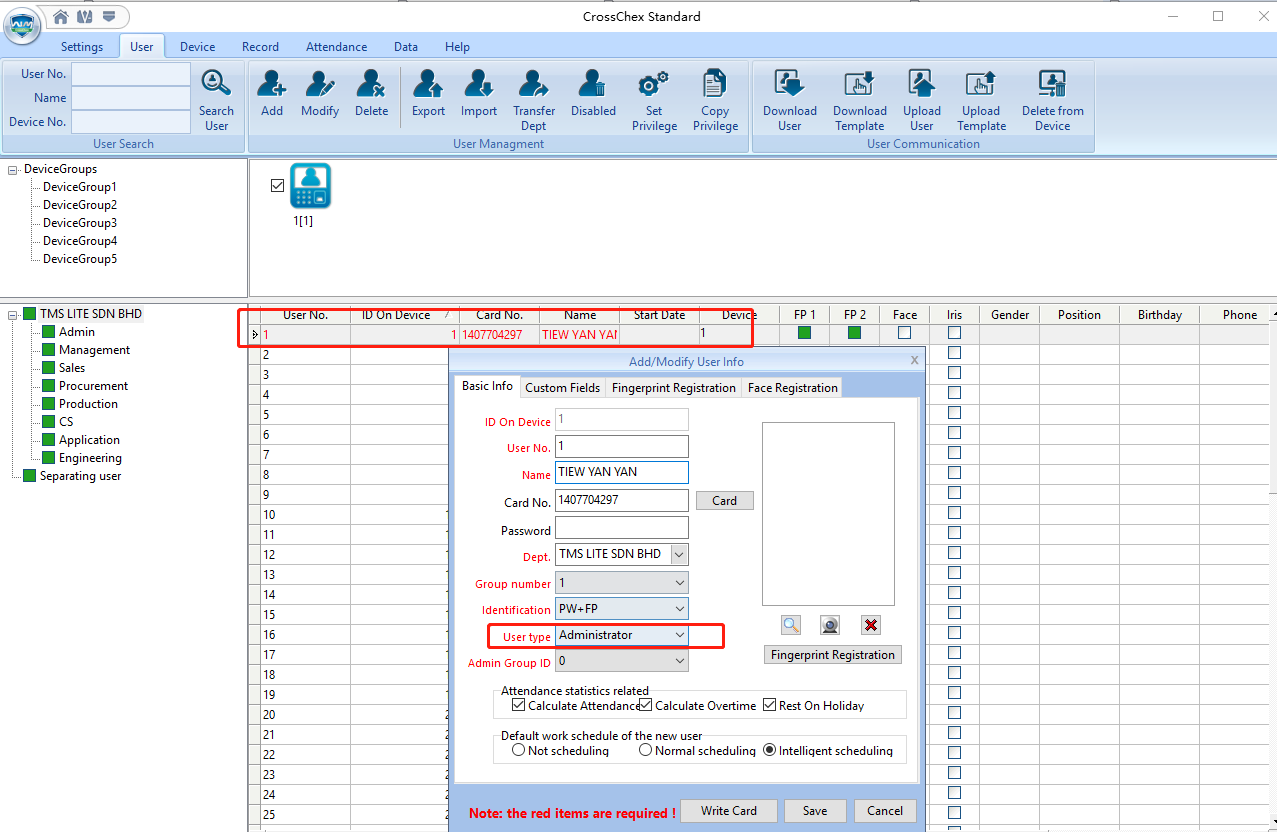
Choose ‘Normal user’, then click the ‘Save’ button. It will remove the user’s admin permission and set it as a normal user. 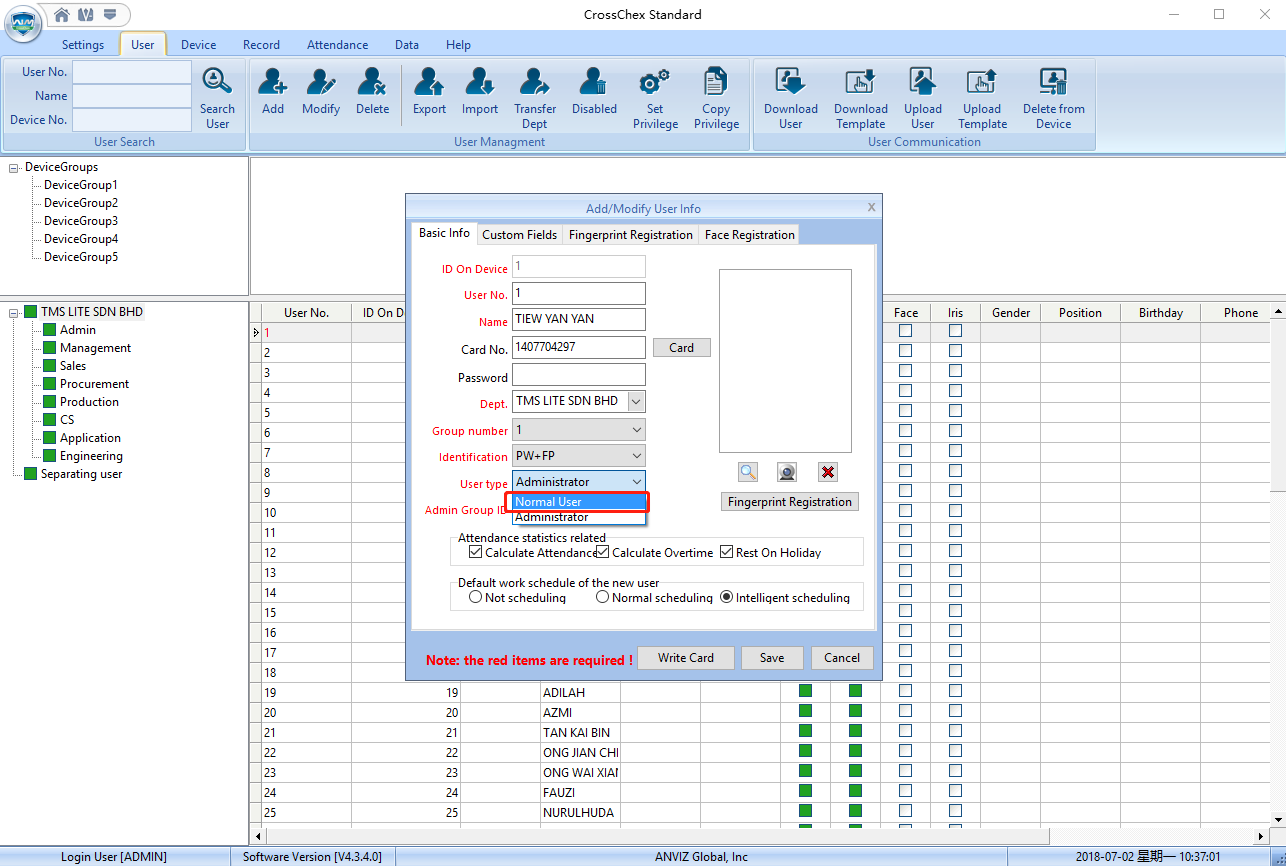
Step 3.1.2
Click ‘Set Privilege’, and choose the group, then click the ‘OK’ button.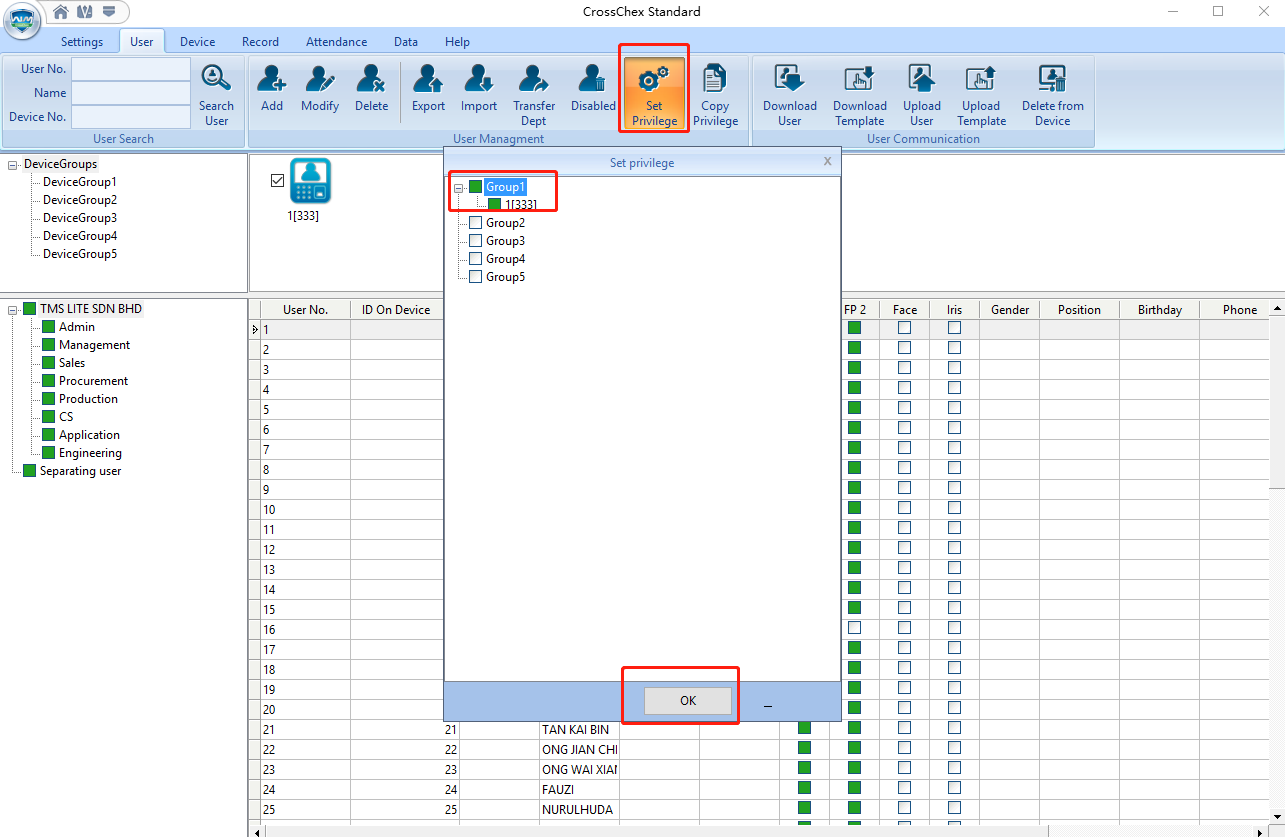
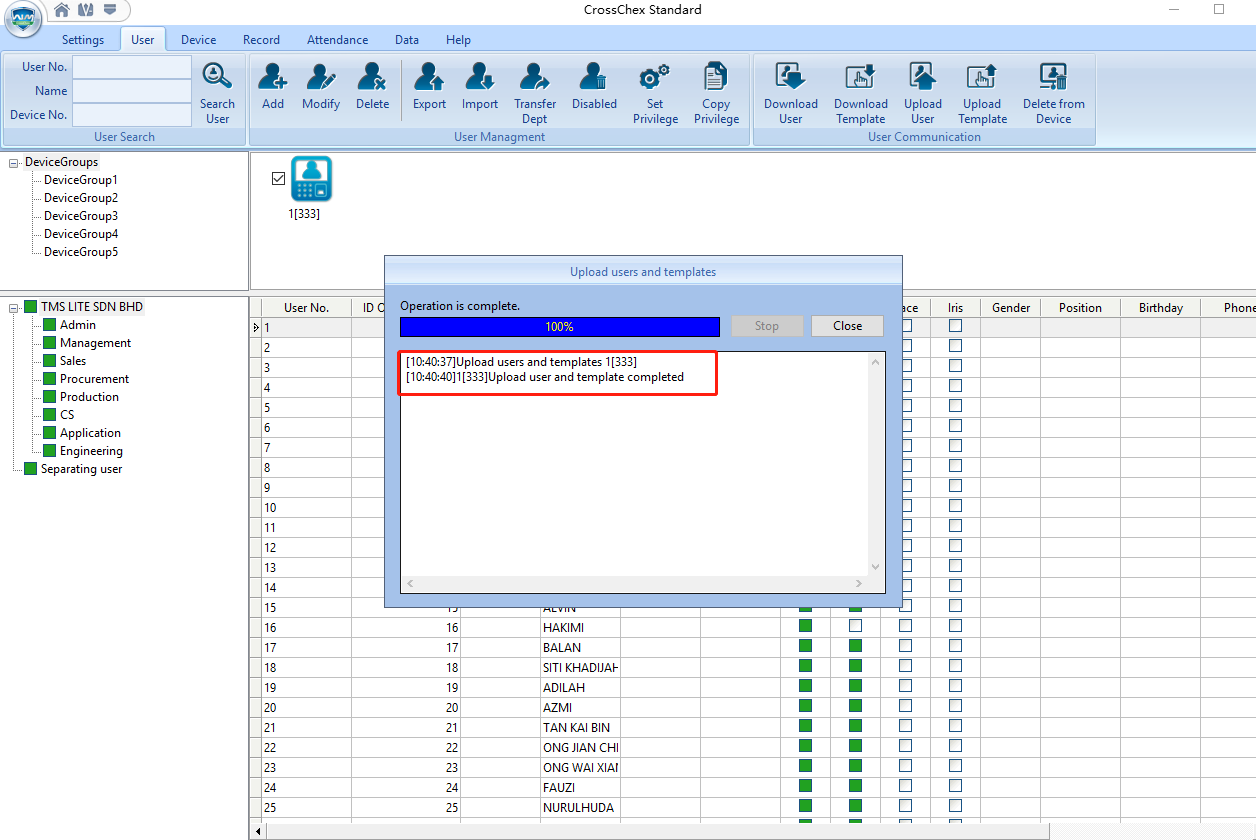
Step 3.2.1: Back up the users and records. 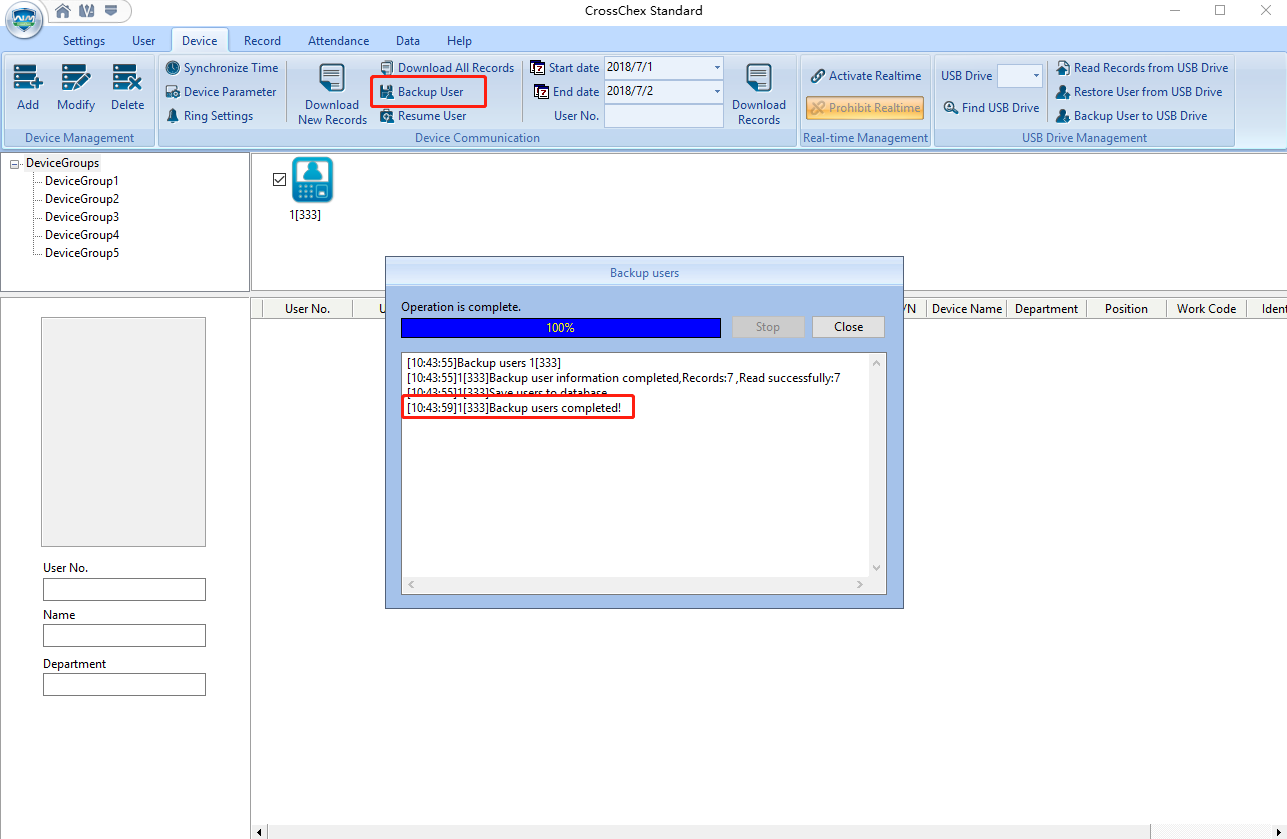
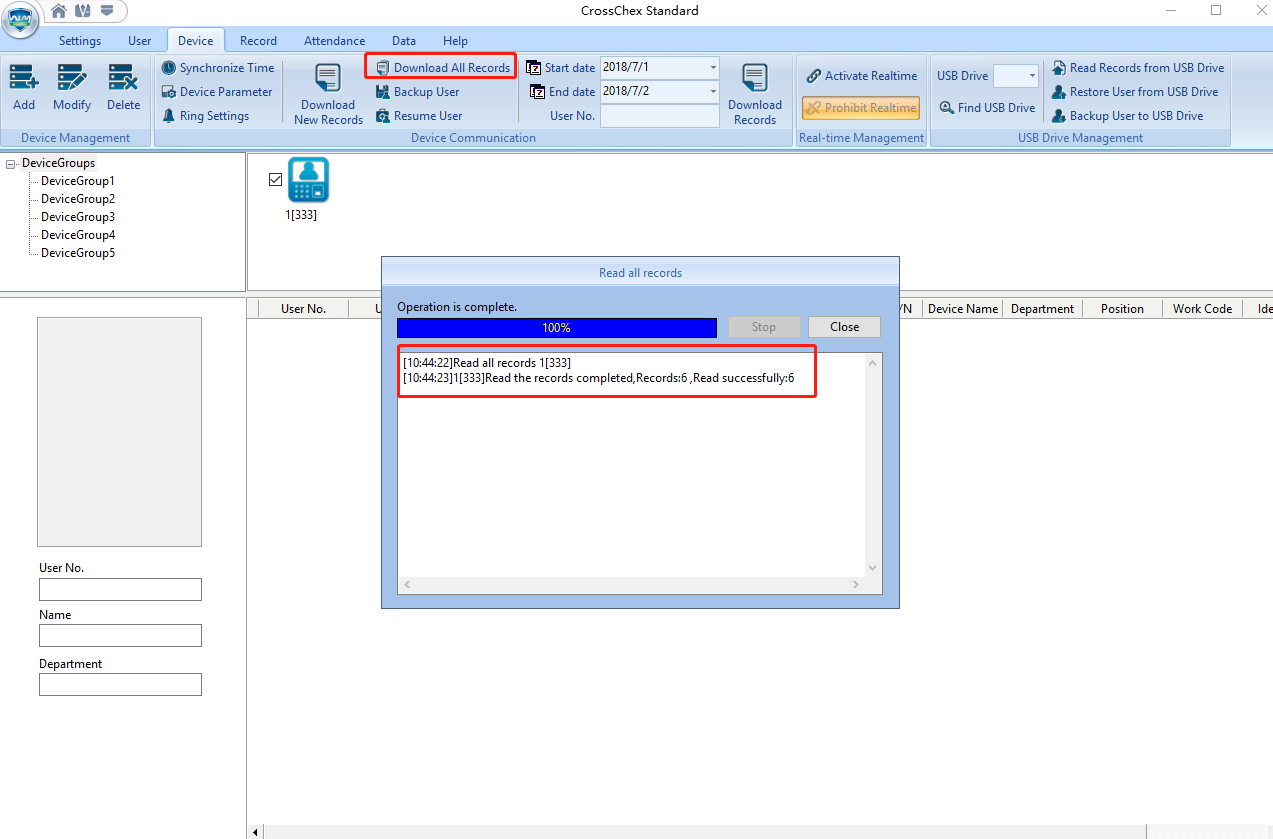
Step 3.2.2: Initialize the Anviz Device (********Warning! All Data Will Be Removed! **********)
Click ‘Device Parameter’ then ‘Initialize the device, and click ‘OK’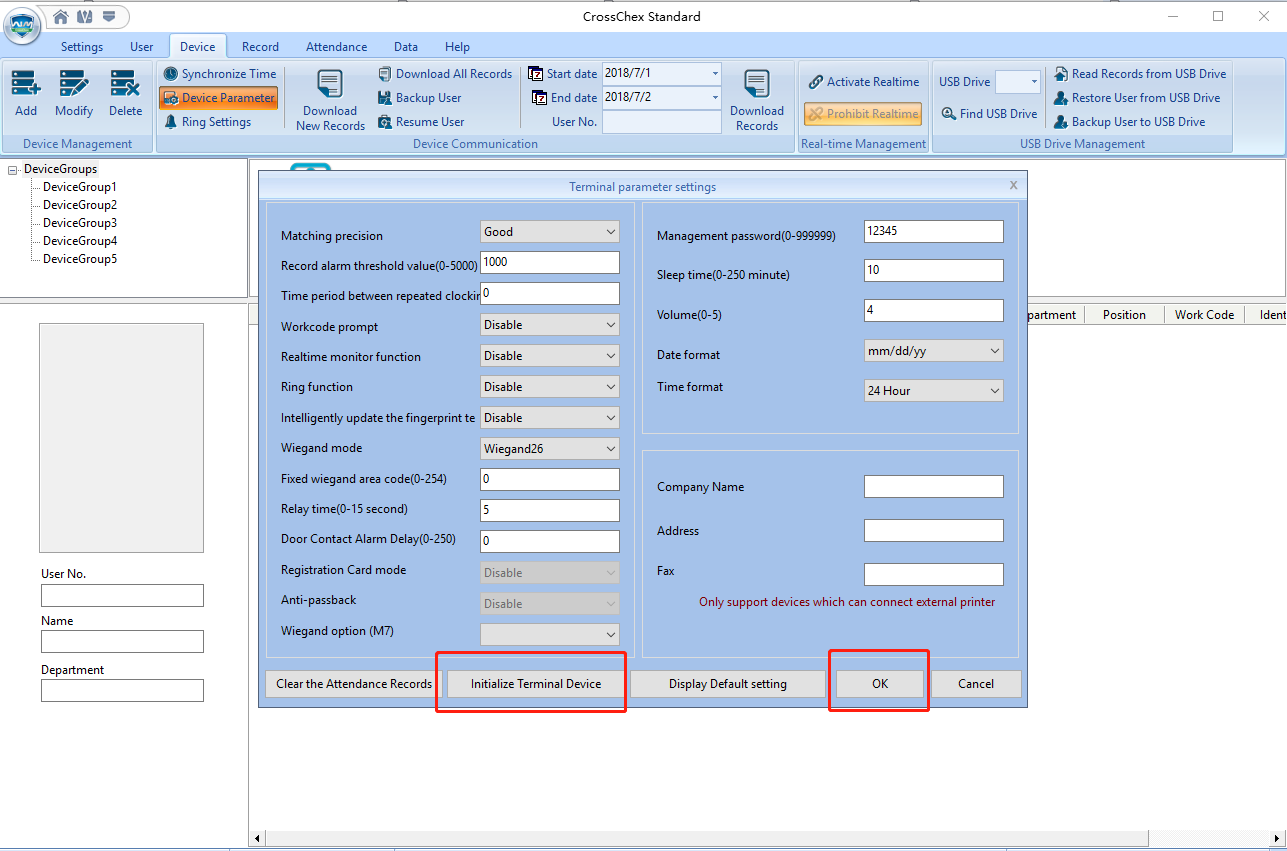
Situation 1: Anviz device is connected to the CrossChex but the admin password is forgotten.
CrossChex -> Device -> Device Parameter -> Management password -> OK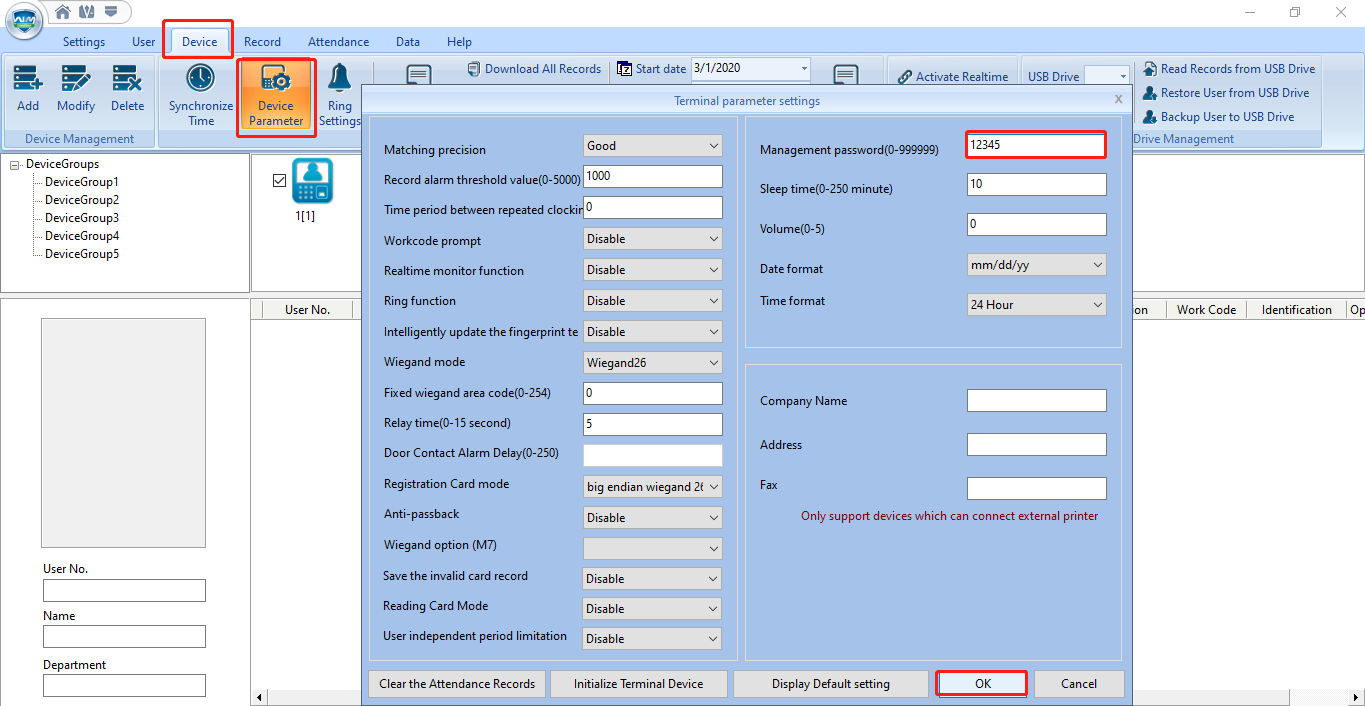
Input ‘000015’ and press ‘OK’. A few random numbers will pop up on the screen. For security reasons, please send those numbers and the device serial number to the Anviz support team ([email protected]). We will provide technical support after receiving the numbers. (Please DO NOT turn off or restart the device before we provide technical support.)
Input ‘In’ 12345 ‘Out’ and press ‘OK’. It will unlock the keypad. Then follow the steps as Situation 2.
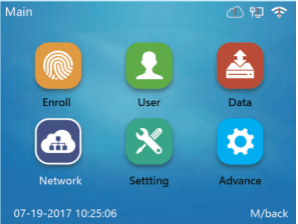
Ethernet Setting in device:
1171.png) | 1172.png) | 1173.png) |
| 1. Go to device administration page (put user: 0 PW: 12345, then ok) to choose network. | 2. Choose Internet button. | 3. Choose “Ethernet” in WAN mode. |
1319.png) | 1318.png) | 1317.png) |
| 4. Choose Ethernet button | 5. Activate Network. | 6. Input the IP address can be connected with PC or choose DHCP (Auto). |
Note: After Ethernet connected, the”!”on right corner Ethernet logo will disappear;
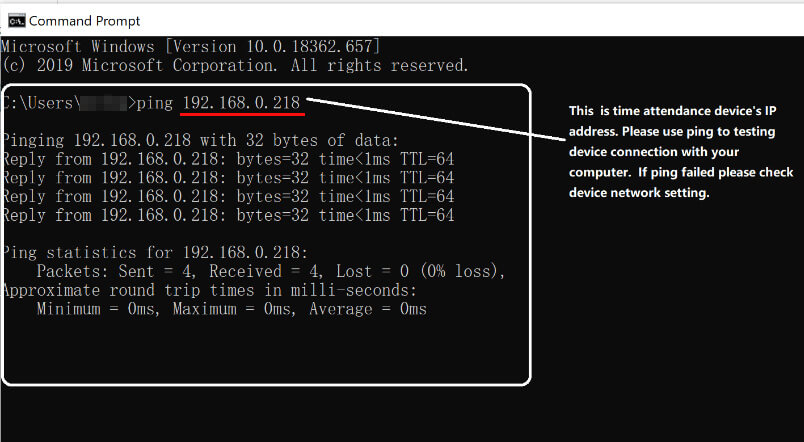
Test device connection with computer:
1858%20(1).jpg)
WIFI Setting in device:
1171.png) | 1172.png) | 1513.png) |
| 1. Go to device administration page (put user: 0 PW: 12345, then ok) to choose network. | 2. Choose Internet button. | 3. Choose “Ethernet” in WiFi mode. |
1675.png) | 1649.png) | 1674.png) |
| 4. Choose WiFi button | 5. Connect to WIFI Available | 6. Choose DHCP |
Note: After Ethernet connected, the”!”on right corner Ethernet logo will disappear; WiFi Setting in Device.
Test device connection with computer:
1858%20(1).jpg)
1.If after power off and restart, time changes to a faulty time, but time keep going , pls change the button battery.
2.If device time is slower or faster less than 3 seconds, pls adjust time by “Time Calibration” parameter in the software.
3.If time error range is more than 3 seconds, maybe the time crystal oscillator is fauty.
4.If the time is messy, maybe the time chip is fauty.
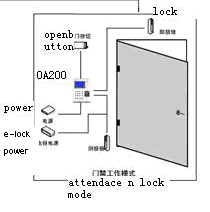
If the reader ‘s standard port has dry contact signal, it can open the lock directly, but if it has wiegand signal, it must connect access controller.
1, connect to lock directly, and any type cable can be used to connect.
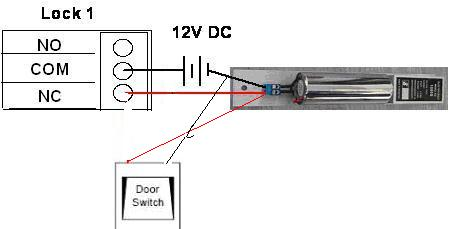.png)
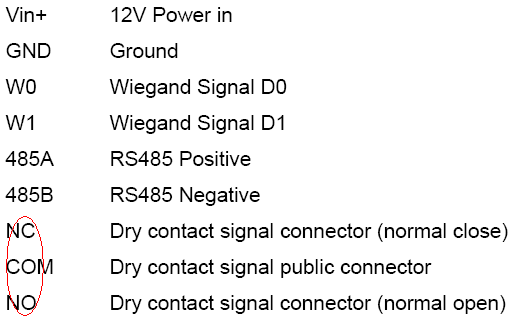.png)
2, Connect through a power supply, which is much safer.
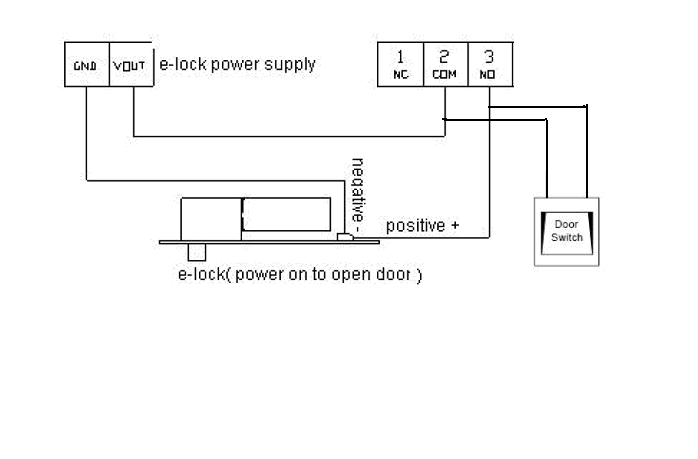.png)
For NO lock, there are no power from these two pin normal, so the NO emlock will be closed normal, and if passed the finger or card, the relay will release, then these two pins will output 12V power, the NO emlock will be unlocked.
For NC lock, there are 12V power from these two pin, so the NC emlock will be closed normal, and if passed the finger or card, the relay will release, then these two pins will be without 12V power, the NC emlock will be opened.
3, you can also use a special e-clock power supply.
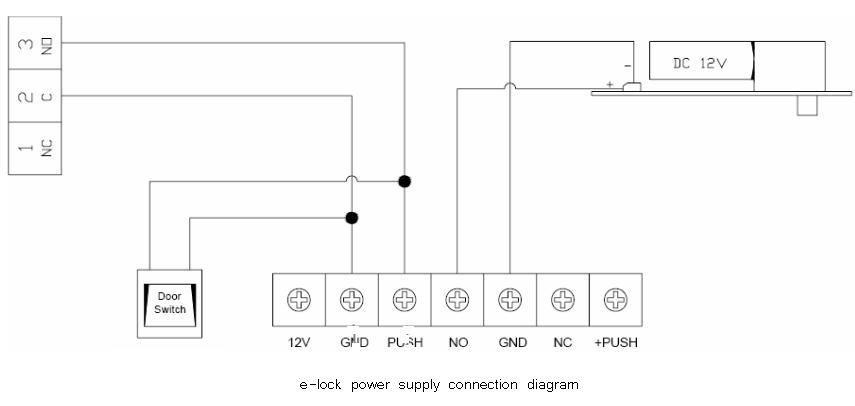.png)
.png)
The remote connect is usually as the following picture:
.jpg)
The Device work as Server model:
And the Router/Switch needs a static public IP address. And one port of the Router/Switch communicate with the Device bind though 5010 port .
So in the Device you should set two options: IP address (public IP address) and Port (5010).
In the software you need to type the Device ID and public IP address into the software.
The Device works as Client Server model:
.jpg)
And the Router/Switch also needs a static public IP address. And one port of the Router/Switch uses the bind 5010 port to communicate with the Software.
So in the Device, there are two options that should be set: Server IP address (public IP address) and Port (5010).
In the software you need to enter the Device ID. IP address is not needed.
In our best efforts to provide an excellent service to all of our users, we are here to release a firmware to prevent the following problems for your M3Pro and M5Plus:
– The freeze with a red light on
– The blocked keyboard
– The connection with network and USB flash drive
M3 Pro: Please download the firmware.
M5 Plus: Please download the firmware.
After the upgrade, please reboot the device and check the firmware version in the device info (Menu -> Setting -> Info) to see if the upgrade is successful.
If the firmware version hasn’t changed, please kindly follow the instructions and upgrade it again.
If the problems still exist with this firmware version, please report the issues to the technical support team. We apologize for any inconvenience this may cause.
You can always reach out to us at [email protected] when you have any questions or concerns.
In our best efforts to provide an excellent service to all of our users, we are here to help you fix the problem of the face registration for Facedeep 5.
If your Facedeep 5 prompts ”Fail. The user is full!” when you register a face, please install this patch. It is a solution for the problem.
Please download the patch.
After installed the patch, please restart the device and check if the problem is fixed to ensure the installation is successful. If not please check the instructions and install the patch again.
Please report any issues to the technical support team. We apologize for any inconvenience this may cause. If you have any questions or concerns, you can always reach out to us at [email protected]
In our best efforts to provide an excellent service to all of our users, we are here to help you fix the problem of the facial recognition for Facedeep 3 and Facedeep 5.
If your Facedeep 3 or Facedeep 5 can’t recognize the users with big beard, please install this patch. It is a solution for the problem.
Facedeep 3: Please download the patch.
Facedeep 5: Please download the patch.
After installed the patch, please restart the device and check if the problem is fixed to ensure the installation is successful. If not please check the instructions and install the patch again.
Please report any issues to the technical support team. We apologize for any inconvenience this may cause. If you have any questions or concerns, you can always reach out to us at [email protected]
There are various USB flash drive in the market, Anviz device can not compatible with all the USB flash drive.
We suggest use SanDisk or Kingston brand USB flash drive. Capacity is under 8GB. File system is FAT32.
If still not working, try again with another one or getting support from Anviz.

Backup the data from machine A and upload the data to the machineB
The data only can be uploaded to the authorized machine. So you should check if the machine is
authorized before upload the data from the software to the machine.
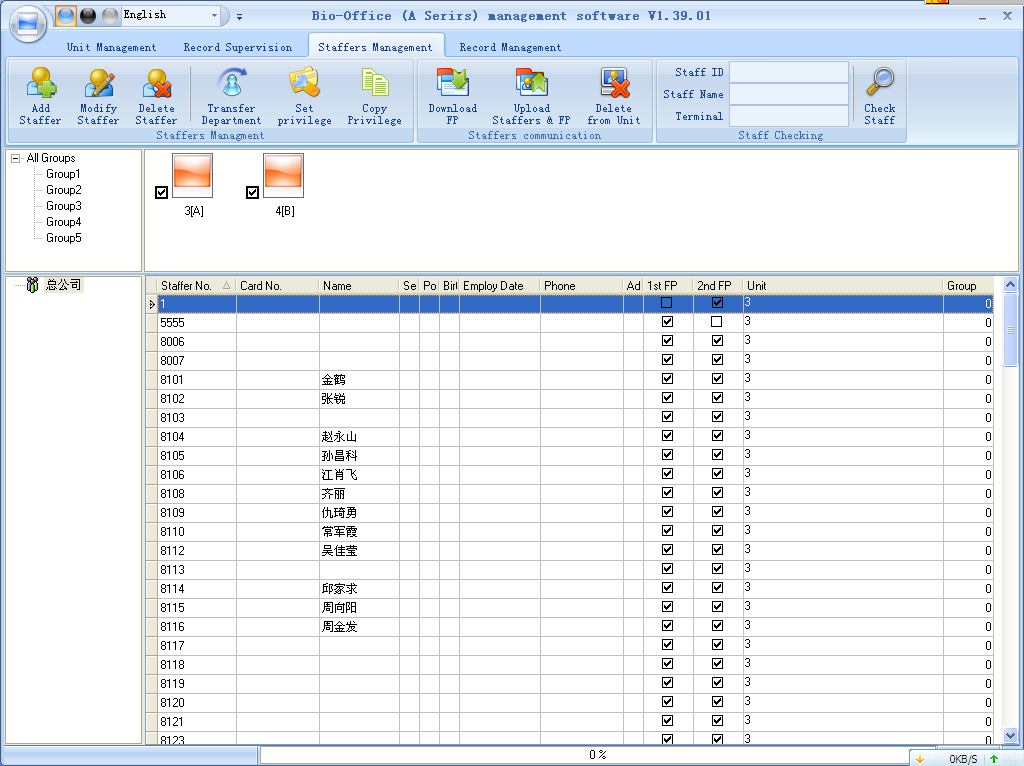.jpg)
For example: There is machine 3(A) and machine 4(B).
We can find that there is only “3” in the column “Unit”. So only the machine 3(A) is authorized.
If you want to upload the data to the machine 4(B) , add the “4” to the column “Unit”.
1. Select all the staffers by pressing the key “Ctrl+A” on the PC’s keypad.
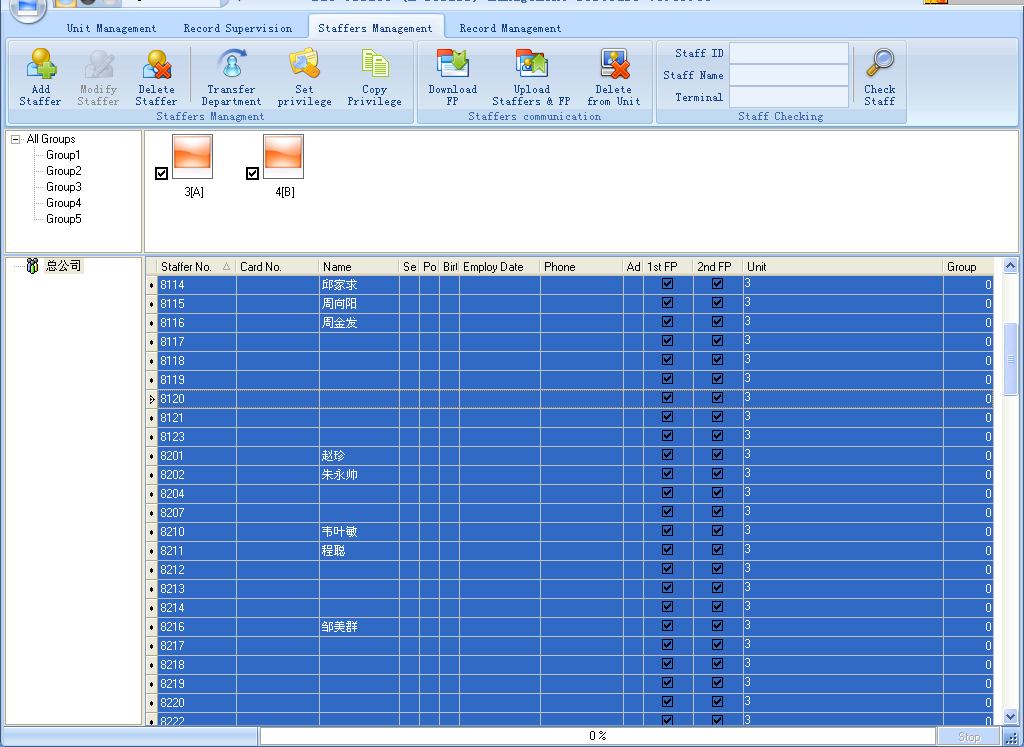.jpg)
2. Click the button “Set privilege” on the software window. The “Set privilege” window pops up:
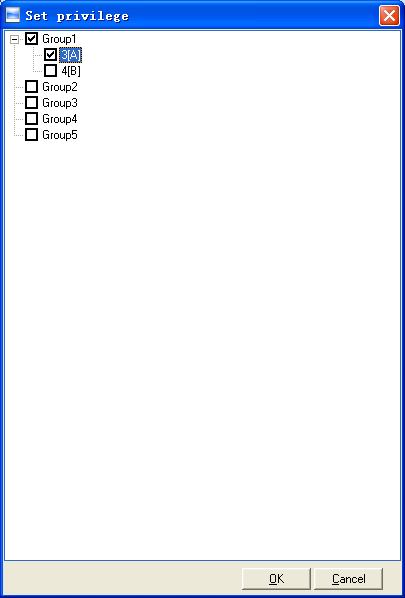.jpg)
3. Select both “3(A)” and “4(B)”. And click the button “OK” .
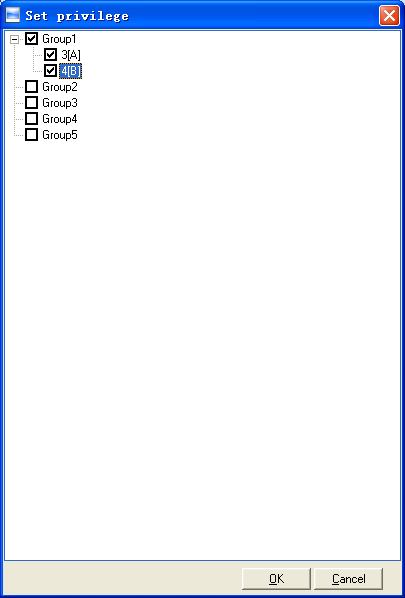.jpg)
4. Now you can find the “3,4” in the column “Unit”. It means that both machine 3(A) and machine 4(B) are authorized machine.
Click the button “Upload Staffers &FP” to upload the data from the software to machine 3(A) and machine 4(B).
5. That’s all. Thanks for reading.
There are various USB flash drive in the market, Anviz device can not compatible with all the USB flash drive.
We suggest use SanDisk or Kingston brand USB flash drive. Capacity is under 8GB. File system is FAT32.
If still not working, try again with another one or getting support from Anviz.

General
This document describes how to migrate data from AIM Standard database to CrossChex Standard database.
Before You Start
Before running the migration tool, you need to:
* Backup the AIM standard database.
* Download and install the new version of CrossChex Standard management software.
Instructions
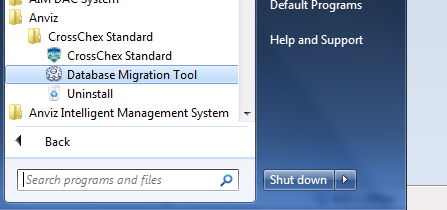
Step 1: Run the migration tool (Database Migration Tool.exe).
Press Start button and select All Programs\Anviz\CrossChex Standard\Database Migration Tool.
.png)
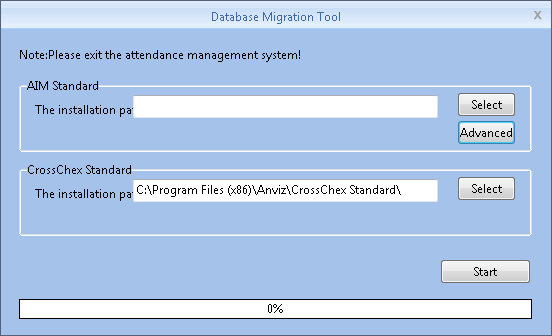
It will bring up the Database Migration Tool window:
.png)
Step 2: The Database Migration Tool will search the path of AIM Standard aromatically. If no search result coming up, you will need to press Advance button and input the database info manually.
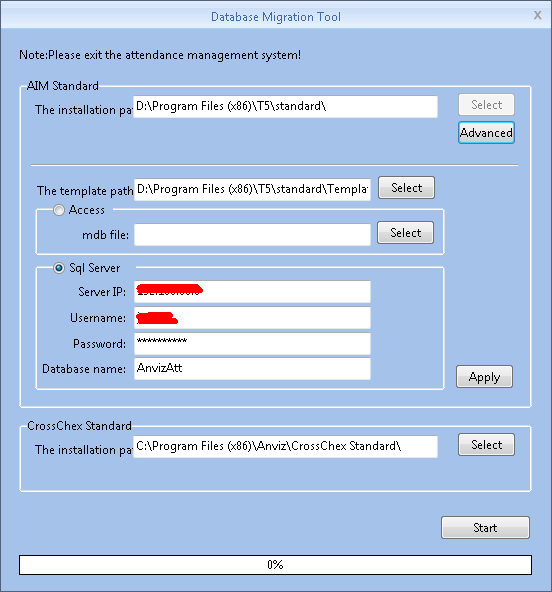.png)
Step 3: Select the CrossChex Standard database path.
Step 4: Press Start button. It will take several minutes to complete the database migration.
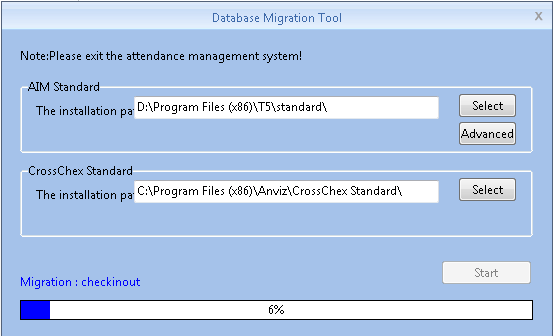.png)
After the database migration is finished, you can Launch CrossChex Standard.
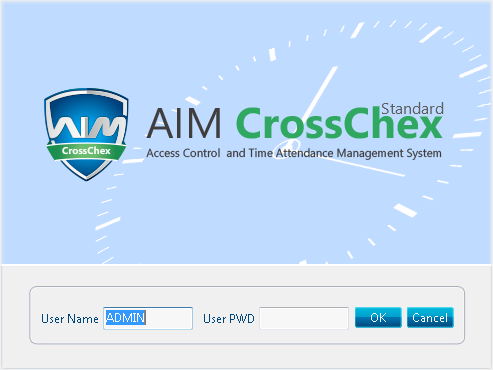.png)
.png)
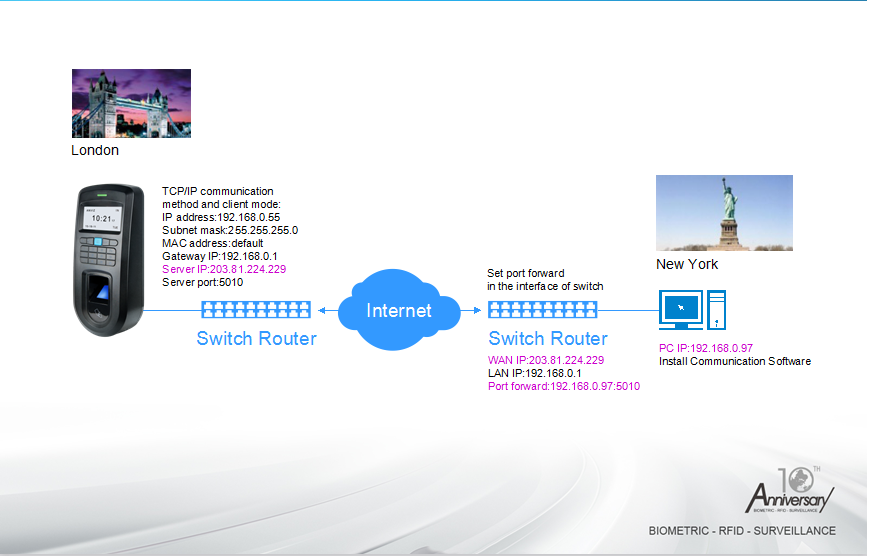
For example, the company HQ is in New York, and the branch company is in Landon. If HQ want to check the attendance report of the branch company, HQ could do step by step as the following.
1. Setup VF30 TCP/IP parameter (The VF30 is installed in London), as below
Mode: Client
IP Address: 192.168.0.55
Subnet mask: 255.255.255.0
MAC address: default
Gateway IP: 192.168.0.1
Server IP: 203.81.224.229
Server port: 5010
Server IP: 203.81.224.229, the server IP should be fixed with public network IP address.
Another the VF30 device can’t support DHCP function.
2. Port forward on the router.
The router public network IP address(WAN IP address): 203.81.244.229
The router internal network IP address (LAN IP address):192.168.0.1
Port forward: 192.168.0.97:5010
3. The attendance software installation on the PC IP address: 192.168.0.97
The router port forward to PC IP, so when the data sends to the WAN IP, the WAN IP will send the data to 5010 port -> PC IP 192.168.0.97
When an employee place his finger on the VF30 in London, the device will generate a record, and the record will be stored in the VF30. When employer download the record from VF30, the record will be downloaded to the router of the IP address: 203.81.224.229, then the router have port forward to 5010 port, which means the record will send to the PC of IP address: 192.168.0.97.
Reason | Solution |
1. Unit power break for a long time(time turn to zero as default) | Synchronize the time |
2. The record hasn’t been downloaded. | Please download the record from the device.
|
3. The capacity has been fully occupied. | Please clear the records in time. |
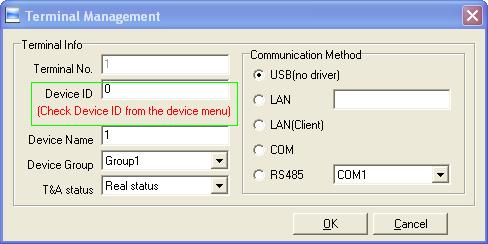
- Connect to PC, open Prjcomm.exe, setup terminal management.
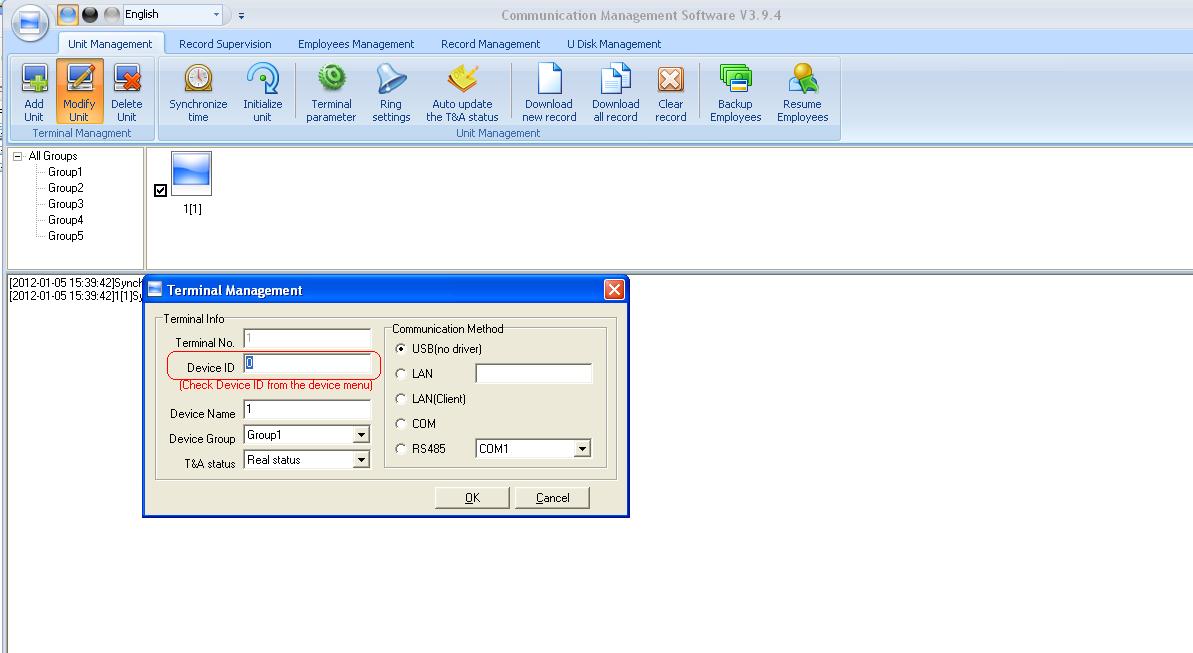.jpg)
2. Device ID, change 0
.jpg)
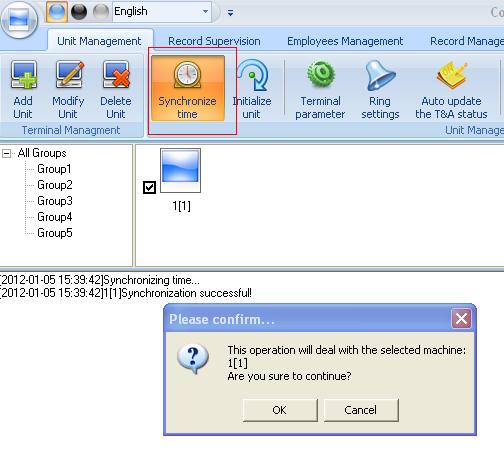
3. Synchronize time, click Ok.
.jpg)
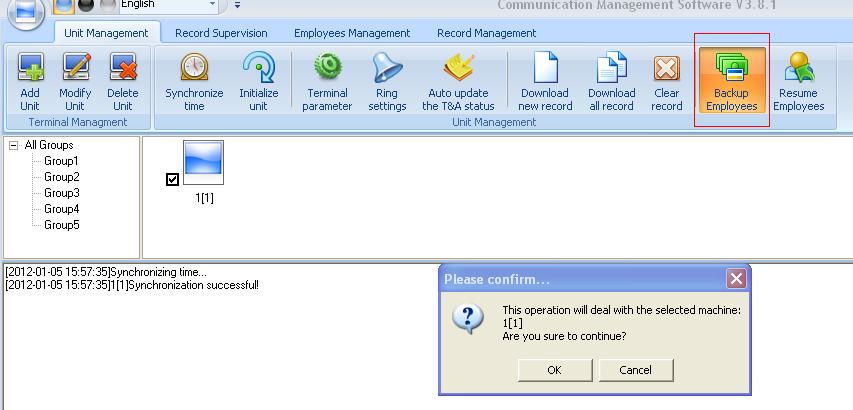
4. Backup employees, click ok
.jpg)
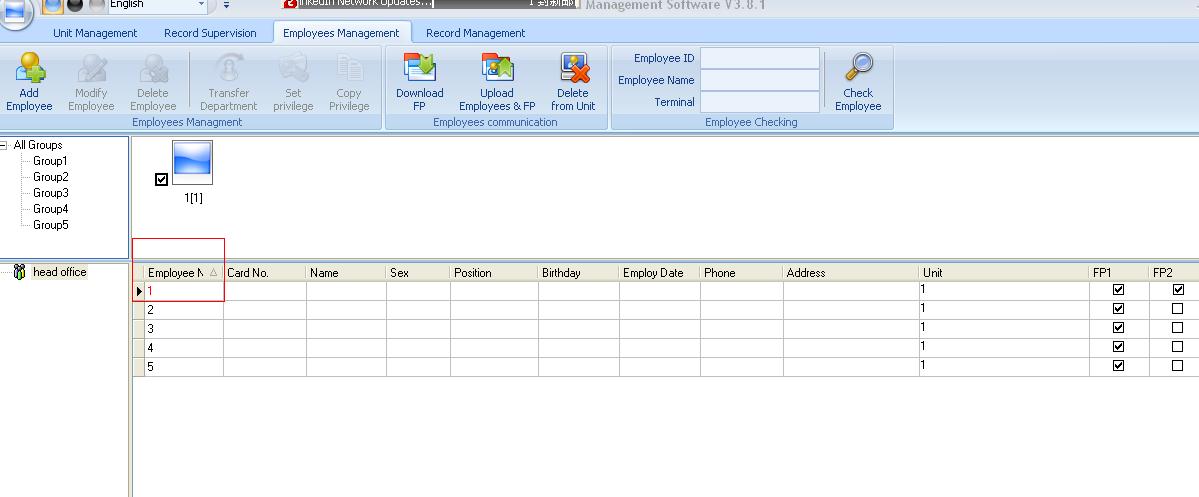
5. Then move to Employees Management, find red word employee NO. (because these red words employee all are administrator).
.jpg)
6. Double click employee NO. , then will pop up below photo, change user type administrator to normal user.
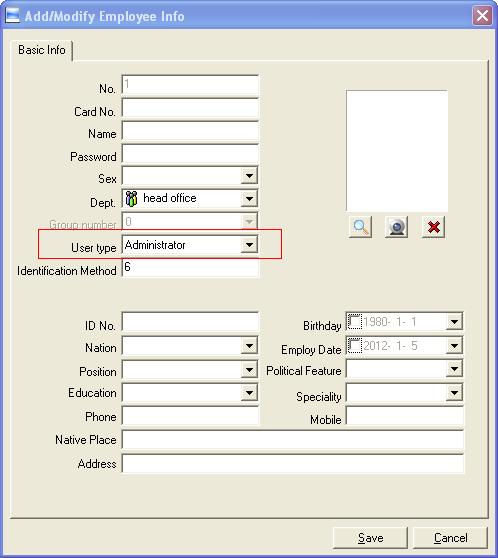.jpg)
7. Now there is no administrator in the device, and you can entry menu as default way.
Not have any FAQs
